I looked and looked and couldn't find any patterns I liked, then I came across a
on Youtube on Kamsnap's channel. The quality was not that great and she said it fits size 2-3 toddler but I found it to be quite tight on my 2 year old who is an average size for a 2 year old. So I am going to make some adjustments to the pattern as I make more but for now I have put together instructions on how to make your own little trainers for your toddler in training using her guidelines and my photos.
So here we go!
What you need:
- 6 sets of Snaps (I use Kamsnaps and they are awesome)
- Kamsnap Pliers
- 1 - 6" x 18" PUL Waterproof fabric
- 1 - 6" x 18" Outer Fabric (I used a 100% cotton but you can use Jersey etc)
- 1 - 6" x 18" Inner Fabric (Non-Wicking fabric, you want your toddler to feel wet. I used Flannel)
- 3 - 4" x 15" Microfiber Soak-er (add more for night time pull ups)
- 2 - 5"x 10" Cotton fabric for Sides
- 2 - 5" Leg Elastics (I used 3/8")
- 1 - 3" Back Elastic (I used 3/8")
- 10 - 4" Clear Elastic (side panels)
- Sewing Machine and Serger if you have one. (If you do not have a serger a sewing Machine will work fine)
***EDITORS NOTE: make your PUL, Outter Fabric and Inner fabric layers wider! We found with the inner layers of microfiber the bulk of the trainer was not wide enough. Also make microfiber soak-er layer a little wider (adjust according to new width of other layers) We would also use a combo of Bamboo and Hemp for overnight diapers as microfiber does not seem to hold the moisture for our heavy wetter. We would also suggest tighter elastic around legs fitted to child's size as ours gaped open as well.
STEP 1: Side Panel Prep
Mark your 2 - 5" x 10" cotton fabric panels for the sides of the trainer down the long side at 1 1/4", 2 1/2" and 3 3/4".
Hem along the long sides of your panels. You can use a rolled hem foot if you have one on your machine or just slightly fold over and sew carefully. you don't want too much of a hem. Just a small one!
Then tack your 5 clear elastics per side panel along each hem and the lines you drew on the panels. Just sew a straight line down along the short edge sewing the ends of the elastics down.
Do this to both sides.
STEP 2: Attaching Soak-er Layer
Pin microfiber fabric and flannel inner layer and sew together. You can use zig-zag or straight stitch.
*NOTE* Make sure when sewing you sew all layers, if you have any underneath layers that get missed they will bunch up when you wash it!
STEP 3: Layer Fabrics
Bottom layer: PUL Shiny Side Down
Middle Layer: Outer Fabric Layer Right Side Up
Top Layer: Flannel Right Side Down, Soaker Side Up
STEP 4: Adding Sides and Sewing Layers Together
Fold the top later over towards the front of the trainer.
Line up along the edge but leave at least 1/4" down. This is important so when you sew all layers together you don't catch it when sewing it along the back.
Fold over elastic side panel with elastic as shown in photo. Lining the fabric is important so the side panels don't get caught in the stitches when sewing layers together.
Do this to both sides
line up so they are even on both sides and fold the top later back over.
Serge or sew along 3 sides leaving the front top panel open
STEP 5: Attaching Elastic.
Flip over to the PUL side and mark the corner with a pen or marker. Then mark at the point where the side panel ends behind the PUL layer.
Then fold in half and match up the side panel pen/marker marks and mark on the other side
It was too hard to see so I photoshop-ed some blue stars where I marked for the elastic. You should have the back end marked on the corners, at the end of the side panels that are sewn on behind the PUL and then down a ways marked again.
Then tack down the elastic where you marked. I re-did this one, make sure you leave 1/4" and then tack the elastic or it just pulls out.
Then attach the leg elastic
STEP 6: Side Panels
Pull the cloth trainer right side out and push out the seams with your fingers to get all the points and sides poked out.
Now its time to sew the clear elastic. Start right next to the body of the elastic and "3 step" zig zag along the elastic by pulling the fabric backwards and pulling the elastic towards you.
**Tip: I find the half way point in the elastic and stretch it to the half way part in the fabric and sew up until there and then continue to the end. it makes for an even fed elastic.
Continue doing this until all 5 on each side are done
then fold over the end and hem the panel to make a nice even edge for the snaps.
STEP 7: Sewing Along The Trainer
Sew along the edge of the trainer but when reaching the elastic points go in 1/2" and pull straight on the fabric while feeding through the machine and stitching along the diaper to allow the elastic to bunch up when the trainer is done.
Fold the top and inner fabrics when you reach the top to the inside of the trainer and stitch along the edge to finish it off.
STEP 8: Adding Snaps
I added three snaps on each side. place snaps not too close to the edge or the fabric will be too thick to correctly install the snap.
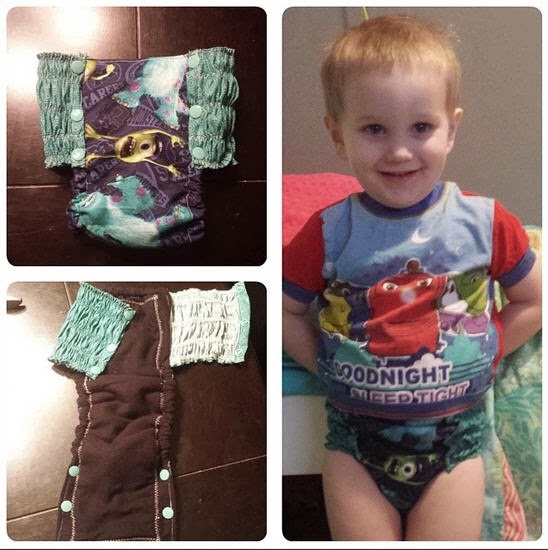
This is what the finished Pull-Up trainer looks like fron the front
and Back
This ends up being about a Size 2 trainer. To adjust the size to a larger fit make the PUL, Outer Fabric and Inner Fabric slightly wider and side panels with clear elastics longer slightly longer as well. You many need to adjust the length of the body of the diaper depending on size as well but this give you a basic idea of how to make a trainer.
This trainer only has 2 layers of microfiber for bedtime I would definitely recommend more especially for your heavy wetters!
If there are any un-clear parts of this tutorial please comment and I will make changes!!