
I looked and looked and couldn't find any patterns I liked, then I came across a 4 part video series on Youtube on Kamsnap's channel. The quality was not that great and she said it fits size 2-3 toddler but I found it to be quite tight on my 2 year old who is an average size for a 2 year old. So I am going to make some adjustments to the pattern as I make more but for now I have put together instructions on how to make your own little trainers for your toddler in training using her guidelines and my photos.


So here we go!
What you need:
- 6 sets of Snaps (I use Kamsnaps and they are awesome)
- Kamsnap Pliers
- 1 - 6" x 18" PUL Waterproof fabric
- 1 - 6" x 18" Outer Fabric (I used a 100% cotton but you can use Jersey etc)
- 1 - 6" x 18" Inner Fabric (Non-Wicking fabric, you want your toddler to feel wet. I used Flannel)
- 3 - 4" x 15" Microfiber Soak-er (add more for night time pull ups)
- 2 - 5"x 10" Cotton fabric for Sides
- 2 - 5" Leg Elastics (I used 3/8")
- 1 - 3" Back Elastic (I used 3/8")
- 10 - 4" Clear Elastic (side panels)
- Sewing Machine and Serger if you have one. (If you do not have a serger a sewing Machine will work fine)
***EDITORS NOTE: make your PUL, Outter Fabric and Inner fabric layers wider! We found with the inner layers of microfiber the bulk of the trainer was not wide enough. Also make microfiber soak-er layer a little wider (adjust according to new width of other layers) We would also use a combo of Bamboo and Hemp for overnight diapers as microfiber does not seem to hold the moisture for our heavy wetter. We would also suggest tighter elastic around legs fitted to child's size as ours gaped open as well.
STEP 1: Side Panel Prep
Mark your 2 - 5" x 10" cotton fabric panels for the sides of the trainer down the long side at 1 1/4", 2 1/2" and 3 3/4".
Hem along the long sides of your panels. You can use a rolled hem foot if you have one on your machine or just slightly fold over and sew carefully. you don't want too much of a hem. Just a small one!
Then tack your 5 clear elastics per side panel along each hem and the lines you drew on the panels. Just sew a straight line down along the short edge sewing the ends of the elastics down.
Do this to both sides.
STEP 2: Attaching Soak-er Layer
Pin microfiber fabric and flannel inner layer and sew together. You can use zig-zag or straight stitch.
*NOTE* Make sure when sewing you sew all layers, if you have any underneath layers that get missed they will bunch up when you wash it!
STEP 3: Layer Fabrics
Bottom layer: PUL Shiny Side Down
Middle Layer: Outer Fabric Layer Right Side Up
Top Layer: Flannel Right Side Down, Soaker Side Up
STEP 4: Adding Sides and Sewing Layers Together
Fold the top later over towards the front of the trainer.
Line up along the edge but leave at least 1/4" down. This is important so when you sew all layers together you don't catch it when sewing it along the back.
Fold over elastic side panel with elastic as shown in photo. Lining the fabric is important so the side panels don't get caught in the stitches when sewing layers together.
Do this to both sides
line up so they are even on both sides and fold the top later back over.
Serge or sew along 3 sides leaving the front top panel open
STEP 5: Attaching Elastic.
Flip over to the PUL side and mark the corner with a pen or marker. Then mark at the point where the side panel ends behind the PUL layer.
Then fold in half and match up the side panel pen/marker marks and mark on the other side
It was too hard to see so I photoshop-ed some blue stars where I marked for the elastic. You should have the back end marked on the corners, at the end of the side panels that are sewn on behind the PUL and then down a ways marked again.
Then tack down the elastic where you marked. I re-did this one, make sure you leave 1/4" and then tack the elastic or it just pulls out.
Then attach the leg elastic
STEP 6: Side Panels
Pull the cloth trainer right side out and push out the seams with your fingers to get all the points and sides poked out.
Now its time to sew the clear elastic. Start right next to the body of the elastic and "3 step" zig zag along the elastic by pulling the fabric backwards and pulling the elastic towards you.
**Tip: I find the half way point in the elastic and stretch it to the half way part in the fabric and sew up until there and then continue to the end. it makes for an even fed elastic.
Continue doing this until all 5 on each side are done
then fold over the end and hem the panel to make a nice even edge for the snaps.
STEP 7: Sewing Along The Trainer
Sew along the edge of the trainer but when reaching the elastic points go in 1/2" and pull straight on the fabric while feeding through the machine and stitching along the diaper to allow the elastic to bunch up when the trainer is done.
Fold the top and inner fabrics when you reach the top to the inside of the trainer and stitch along the edge to finish it off.
STEP 8: Adding Snaps
I added three snaps on each side. place snaps not too close to the edge or the fabric will be too thick to correctly install the snap.
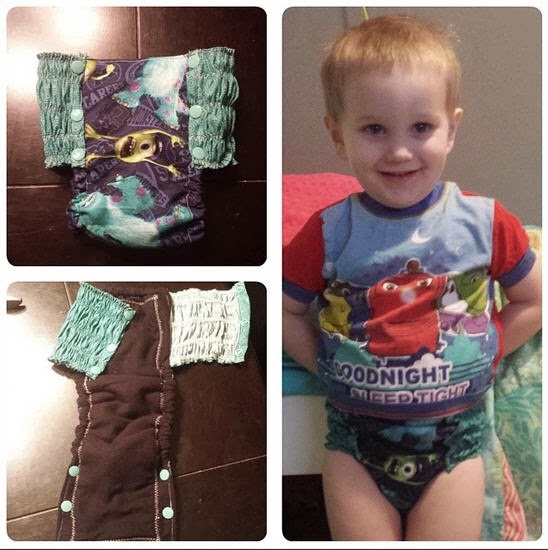
This is what the finished Pull-Up trainer looks like fron the front
and Back
This ends up being about a Size 2 trainer. To adjust the size to a larger fit make the PUL, Outer Fabric and Inner Fabric slightly wider and side panels with clear elastics longer slightly longer as well. You many need to adjust the length of the body of the diaper depending on size as well but this give you a basic idea of how to make a trainer.
This trainer only has 2 layers of microfiber for bedtime I would definitely recommend more especially for your heavy wetters!
If there are any un-clear parts of this tutorial please comment and I will make changes!!
Thanks for the tutorial... really helpful.
ReplyDeleteIs there any particular reason you used the plastic clear elastic for the side panels instead of just using something like elastic thread? Would that kinda of "ruching" made with elastic thread work just as well? Just trying to avoid buying something new when I already have other items on hand. ;)
ReplyDeleteYou could try the plastic thread on a test piece and see if it gives you the same effect, I did not try it. I went for something that was stretchy and durable. It worked really great!
DeleteThank you for this tutorial, I've been looking for a pull up cloth diaper pattern.
ReplyDeleteI've a little question, how much wider should the inner, outer and middle layer be? And I'm not sure what you mean when you write 1-6" x 18" pul/outer/inner fabric
1 is the quantity, the size you should cut it is 6" by 18"
DeleteJust wondering how these worked for you and your son was the elastic irritating to his sides at all? Great tutorial I have seen the videos you mention and had some questions your photos cleared them up for me though☺
ReplyDeleteJust wondering how these worked for you and your son was the elastic irritating to his sides at all? Great tutorial I have seen the videos you mention and had some questions your photos cleared them up for me though☺
ReplyDeleteHe didn't seem to be bothered too much by the elastic, although some of them seemed a little tight on his chunky legs. he would have been happier with a size up from these ones. we just used them for a short time before he stopped needing them.
DeleteThis comment has been removed by the author.
ReplyDeleteI did end up shortening the length and the lengthen line by an inch and a half, which I'm glad I did. Find Out More
ReplyDeleteI have been googling for days for something like this. Thank you!
ReplyDeleteI have a 6 1/2 year old and a nearly 4 year-old both in night nappies. I'm fed up with the cost and plastic in disposables associated with this, plus I think the dry feel of disposables (and being a really heavy sleeper) is what is holding my older boy back from being night dry. I'm going to attempt some night nappies to use instead, especially as I'm due with child number 3 next month so I'll be doing loads of nappy washes anyway.
Given the large bladder sizes I'm sewing for I'm going to try and have a pocket style. I figure being able to pull the absorbent layer out should make for faster drying.
I did a pocket style on mine and liked it much more than the ones I sewed without.
DeleteContingent upon the state, you might not need to make good on sales government obligation. Jongenskleding
ReplyDeleteYes i am totally agreed with this article and i just want say that this article is very nice and very informative article.I will make sure to be reading your blog more. You made a good point but I can't help but wonder, what about the other side? !!!!!!Thanks Russian military uniform
ReplyDeleteMmm.. good to be here in your article or post, whatever, I think I should also work hard for my own website like I see some good and updated working in your site. https://roycollections.com/bata-shoes/
ReplyDeletethank you for your interesting infomation. personal trainers near me
ReplyDeleteThe apparel marks container of various sorts particularly in the size. They can be formed like a band. A few times it very well may be molded in a little square shape sewed at the top or even square or oval formed. On occasion the marks are stretched yet that can be awkward for the wearer.Iron On Name Patches
ReplyDeleteThis can be a good video tutorial. You just need to post video on youtube and buy some youtube views from this site https://viplikes.net/
ReplyDeleteThis is not fact and you might find that if you have above average ceiling then triple bunks will be ok. bunk bed with slide
ReplyDeleteI have read your article; it is very informative and helpful for me. I admire the valuable information you offer in your articles. Thanks for posting it. Pewdiepie Merch
ReplyDeleteI think that thanks for the valuabe information and insights you have so provided here. onsies
ReplyDeleteThis foam mattress has several different densities making some harder than others. Polyurethane foam beds are petroleum based. They too come in different densities and are one of the more popular foam beds. cheap truck mattress
ReplyDeleteI will visit again for more quality✅ contents and also I recommend this site to all who are✅
ReplyDeleteแทงบอล
This surely helps me in my work. Lol, thanks for your comment! wink Glad you found it helpful linen dress
ReplyDeleteWoh I enjoy your content, saved to bookmarks!!! Turkey transit visa for US citizens... Ordinary passport holders are required to have a visa to enter Turkey. You can get an online visa transit Turkey.You are ready to fill out an application form in the Turkey Visa Pre-Application System.
ReplyDeleteThank you 😊 The international travelers who travel to Kenya need Kenya evisa application. That they can apply online and can get the 24*7 customer assistant.
ReplyDeleteI recently found many useful information in your website especially this blog page. Among the lots of comments on your articles. Thanks for sharing. visit this url
ReplyDeleteThankyou for the special article. The Government of Ukraine grants the e-visa online. And now you can easily know about the Ukraine visa fees?. The Ukraine visa fee is dependent on your nationality and type of visa.
ReplyDeleteThis comment has been removed by the author.
ReplyDeleteHello everyone, are you interested in traveling to a country? Yes, you can apply for a visa online via our VisaCent website. You can fill out your visa application form online within 5 to 10 minutes, first select which country you are from and then select which country you need a visa, then fill and submit the form. And your visa processing depends on your visa country and visa type.
ReplyDeleteThank you for share a best article for us its very helpful for us. keep sharing.
ReplyDeleteimmunitybloom
Shield-om
Rawcurin
Unfastened waec runs 2023 questions and solutions are actually to be had. See the quality NECO expo runs so one can help increase your score and your typical overall performance within the 2023 NECO exam below.
ReplyDeleteAre you looking for a great supply to your exam achievement in 2023? https://gistpower.com/ is the high-quality 2023 jamb expo/runz website for you, you have to be happy you discovered this splendid website.
ReplyDelete
ReplyDelete"Such captivating literature! I'm overjoyed to have stumbled upon and delved into it. Your work on this content is exceptional; I found it incredibly absorbing. I appreciate you sharing such exceptional and distinct information." Do you Know Azerbaijan and UAE: Tourist Visa Waiver Implemented for promoting tourism by allowing visa-free travel between the their nations."
I'm overjoyed to have found this treasure trove of wisdom. It's the type of guide that should be passed around, as opposed to the erroneous information often found on other blogs. Also There are latest updates for fashion connoisseurs about the 7 Best Shopping Malls in Antalya.
ReplyDeleteIt's my pleasure to declare that this website is truly remarkable. I'm eagerly looking forward to more posts like this from you. I have some valuable information to share; please click on the link for further details. Revolutionary Train Links Four European Capitals. This groundbreaking transportation system offers a fast and efficient way to hop from one cultural hub to another, all while enjoying the picturesque landscapes in between.
ReplyDeleteI hate when clothes shrink in the wash. https://thegoodwashlaundromat.com/
ReplyDeleteYour post truly moved me, as it explored the intricacies of human relationships and the profound effects of simple, compassionate acts."I have some important insights to share." "When you apply for visa to Turkey, it's important to follow the specific guidelines and requirements set by the Turkish authorities. The application process may differ based on your nationality, so thorough research is essential for a smooth and successful visa application."
ReplyDeleteIn your blog post, you've artfully combined wisdom and eloquence. The precision with which you delve into complex subjects deserves applause. Your insightful perspectives strike a chord, encouraging deep contemplation. Your unwavering dedication to research and writing is apparent. i am eager to share some information with you. Securing a Turkey visa for Canadian is a straightforward process, offering accessibility and convenience. Navigate the application smoothly to embark on your journey, ensuring a seamless experience for Canadian travelers.
ReplyDeleteJust wanted to give you a quick heads-up: I noticed a problem with your article when viewed in Internet Explorer. The text seems to be extending beyond the screen, and I'm not sure if it's a formatting issue or related to browser compatibility. Nonetheless, your design and style are impressive! I hope you can tackle this issue promptly. Cheers! transit visa Turkey for indian, Indian citizens need a Turkey transit visa to travel through Turkey. This visa allows a stay of up to 30 days in Turkey.
ReplyDeleteThe effort and dedication you've poured into your website are truly admirable, and the wealth of in-depth information you offer is outstanding. It's refreshing to find a blog that doesn't rely on outdated content. Your articles are a fantastic read! I've saved your site and added your RSS feeds to my Google account.Brazil Delays Visas for Aussies Canadians USA, Brazil has postponed visa processing for Australians, Canadians, and Americans, causing delays for travelers. Stay updated on this development for travel plans.
ReplyDeleteYour adept interweaving of deep analysis and lighthearted humor lends this piece a unique charm. Your unconventional stance on [topic] injects a burst of creativity into the narrative, defying expectations with grace. Supported by meticulous research and eloquent writing, it offers a truly enriching experience. Anticipating more content that stimulates the intellect and brings joy. Congratulations on your exceptional craftsmanship! Can I get on arrival visa to India from Australia? AUS citizens. Travelers need a visa to visit India for Business or Tourism for a maximum stay of 180 days in 1 calendar year. An India eVisa is the fastest and easiest way of obtaining a visa for India because travelers can submit their applications and supporting documents online.
ReplyDeleteThis comment has been removed by the author.
ReplyDeleteBlogging regularly is something I do, and I genuinely value your exceptional content. This captivating article has caught my attention. I've made it a point to bookmark your website and stay updated with fresh information, typically on a weekly basis. Additionally, I've subscribed to your RSS feed. "Streamline your travel with Azerbaijan online visa application. Conveniently apply from anywhere, saving time and hassle. Experience seamless entry to Azerbaijan with our efficient online visa process."
ReplyDelete"What a delightful discovery this blog is! It's a treasure trove of wisdom and wonder, where every post is a gem waiting to be unearthed. The author's passion for their subject shines through in the thoughtful analysis and engaging prose. How to get a tourist visa to Saudi Arabia ? To obtain a tourist visa to Saudi Arabia, individuals typically need to apply through our page , submit required documents such as passport details and a recent photograph, pay the visa fee, and await approval electronically.
ReplyDelete
ReplyDeleteYour blog invites me on a captivating expedition through the convoluted corridors of human cognition, each turn revealing new insights and understandings. It showcases the depth of our collective consciousness, prompting me to explore further into our shared experiences. To obtain an eta Kenya single entry visa from India, applicants can apply online through the official Kenyan eVisa portal. Processing time varies but typically takes around 2-3 working days.
Creating blog posts is integral to my daily routine, and your content is exceptional. This article piqued my curiosity deeply. I've made it a habit to bookmark your site to stay current with new insights, regularly visiting every week. Can I get a visa on arrival in Egypt from UK? Prior arrangements, obtaining a visa apply online are required. UK citizens can obtain a visa on arrival in Egypt. It's essential to plan ahead to ensure a smooth entry process into Egypt.
ReplyDeleteYour profound insights truly resonate with me. The eloquence with which you express your thoughts highlights the complexities of our reality, urging us to delve deeper into our understanding. Your words have ignited a spark of introspection within me, prompting a reassessment of my beliefs and perceptions. Your perspective offers a fresh lens through which to view the world, fostering a sense of connection among us all, and here I am going to share india visa for sri lankan It's a delight to encounter such thought-provoking content that challenges conventional thinking and encourages meaningful dialogue. Thank you for sharing your wisdom and for inspiring us to explore the depths of our existence.
ReplyDeleteYour approach to explaining intricate concepts is outstanding, making them accessible and engaging. The way you communicate ensures that readers from various backgrounds can grasp the ideas. The practical examples and valuable tips you include are exceptional. It's a must-read for anyone keen to expand their knowledge. Ethiopia cost for Portuguese citizens For Portuguese citizens planning a trip to Ethiopia, it's essential to consider the expenses associated with accommodation, meals, transportation, and activities. Ethiopia offers a range of options to suit different budgets, from budget-friendly guesthouses to luxury hotels.
ReplyDelete